
In 2016 we released our JavaScript SDK, which brought Button's core functionality of rendering the features or services of one app in another to the mobile web. Broadly, this meant that with our snippet installed on a web page we could render context-specific Buttons by fetching some data based on the current session, injecting some styles and DOM, and hooking up a few event handlers. The result looked something like this:
Today, many versions later, we want to be just as confident in every release we cut as we were in the first one. This post will cover the how and why of just one of the ways we try to ensure that.
So come along! I'll be your tour guide on this most excellent testing adventure.
Our SDK is a humble guest in the house of our partners, which means a few things. First, forever and always, is that any bugs we ship reflect negatively on them to their users (it's not just our reputation on the line). Major bummers ahoy if we violate our partner's trust. Second, is that we play by their rules. If they want to set all <span /> elements to display: block, that is their prerogative and we should give best-effort to still render properly in such conditions without interfering with any global state.
So of course, we have a suite of unit and integration tests that assert against the different layers of our application code. We're pretty sure we know when the JS breaks. Solid, right? Please, consider the following:
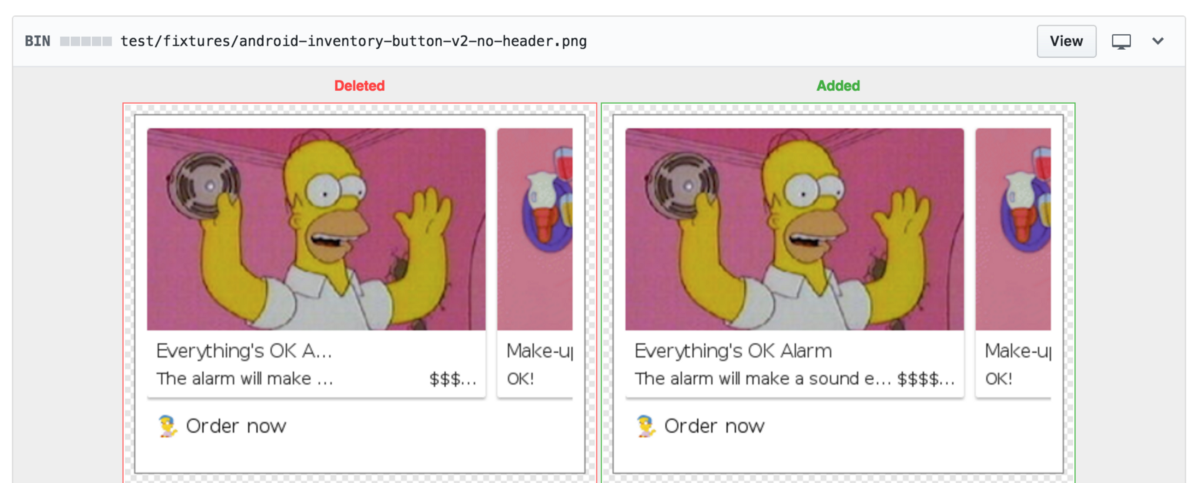
Exhibited here are two different renderings of our DOM, each with a clean bill of health from our JavaScript tests. On the right we notice proper truncation of some long text while the left instance is completely bogus. This would be a very costly mistake for us to roll out. How did this happen?
It turns out we're using a CSS class to handle the truncation:
https://gist.github.com/griffinmyers/ea6c40761d9cc2d24d576a193e9806f8
and applying that class name to a DOM element imperatively in JavaScript. Except not really. In both my application code and my unit test, I've mistakenly written .ellipses. Unfortunately, all the unit tests pass.
In another change, I may tweak some iOS styles that unintentionally affect our Android ones. Classical unit tests are failing to detect these sorts of errors and we're left with less confidence in every change. Given the cost of a bad release, we're going to have to verify correctness by loading our medley of code and styles into a browser and checking all permutations of state by hand unless...
Great, so we're going to build some sort of test suite that will let us know when we've broken rendering. But before we put paws to code it's prudent to be upfront about what we specifically want to accomplish and what we specifically aren't worried about. Let's jot it out:
Procedurally, we need to render a bunch of states and then check that each state matches what we expect. In less ambiguous terms:
To test a new state, we can:
To delete a state, we can:
To ordain a change in how we render a state, we can:
1. Make our code change (JS, CSS, or otherwise)
2. Run the test
3. Copy the image from results to expectations
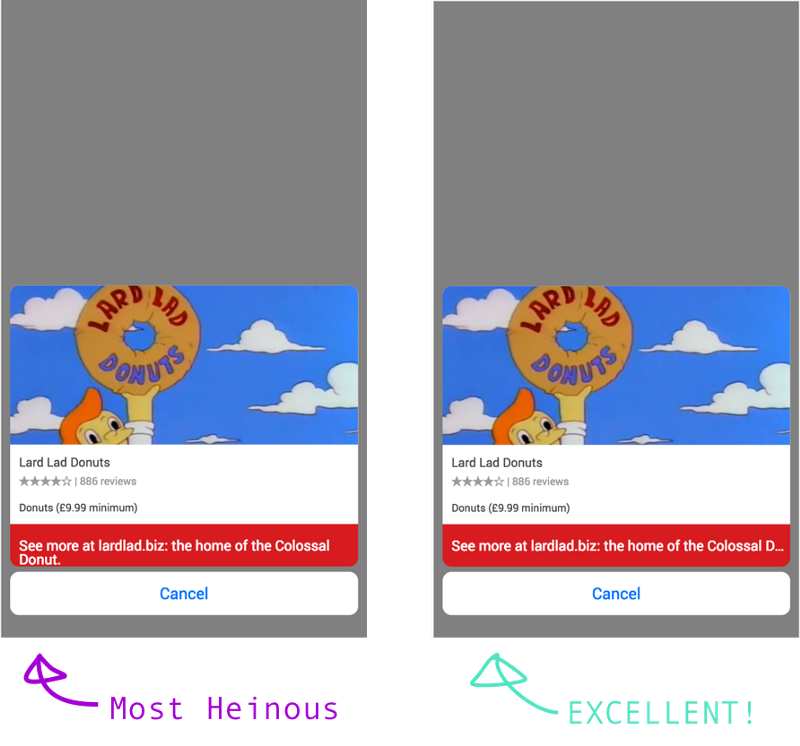
The nice thing about this is we have to commit our set of expectations to master same as we would any other expectation. It gives us a formal process for signing off new rendered states and alerts us when we're deviating. Here's one example from a pull request where we wanted to change the dimensions of some text fields:
This flow requires roughly the following set of tools:
There are many totally excellent choices for any of these responsibilities. While we ended up choosing a few that the rest of this post will go into detail on, we hope you try something different (especially if it aligns better with your goals) and report back with how it went (the web integration testing world is a crowded one and moves fast).
For a browser, Headless Chrome looks extremely promising, and had we rolled this framework out more recently, it would have likely been our choice. For our current purposes, we can use PhantomJS (now abandoned) because it checks all our requirements, runs as a headless browser (i.e. without a GUI, so we don't have to worry about mocking a display environment on our CI server), and has been a strong community choice for years (we've used it successfully on other projects).
We'll use Karma as our tooling for piece #2. It will handle things like actually invoking and communicating with the PhantomJS process, setting up our browser environment and available assets, installing our test framework, etc.
Jasmine will be our testing framework for piece #3. It will provide us ways to define and group our test cases.
Piece #4 calls for image diffing, one of the more fungible bits of tech in our description (it has a very small interface we'll be using in just one place). We'll use the (now defunct; but convenient) ImageMagick wrapper provided by Uber, image-diff.
Finally, this whole stack has to run on our CI server, which for us means running in a Docker container. Aside from being convenient (there's no need to set up the environment on each testing agent), running the test suite in a Docker container buys us the goal of reliably running the suite locally. A problem that's hard to avoid is the subtle rendering differences you'll experience from OS to OS, which could be as trivial as which system fonts are available for rendering. We'd like it if a colleague running Linux or Windows could run the suite locally same as me on my Macbook. There's a great chance you'll find tiny differences between even very similar machines. They're fantastically uninteresting bugs to look into, and Docker insulates us nicely from them by providing a reliable rendering environment independent of the host machine.
If this feels like a lot of tooling you're not alone. Hopefully when you've finished your own implementation you'll appreciate the role each plays... or have come up with a simpler way.
With what you've read so far, you're already well equipped to venture forth and put a visual-diff testing setup together. If you're after something a bit more concrete, here's an example of how it can all fit together (please take the following word of encouragement to heart).

As a prerequisite, I'll assume you've already gotten Docker set up for your system.
Additionally, we can add the following packages we'll need to our project using whichever package manager you prefer:
$ npm install --dev image-diff, jasmine, jasmine-spec-reporter, karma, karma-jasmine, karma-phantomjs-launcher, karma-spec-reporter
To orient, we'll be creating the following directories and files as we proceed:
.<br>├── package.json<br>├── Dockerfile<br>└── test<br> ├── assets<br> │ └── homer.jpg<br> │<br> └── visual-diff<br> ├── results<br> │ └── button-with-long-subtitle.png<br> ├── break-styles.css<br> ├── diff-runner.js<br> ├── diff-test.js<br> ├── expectations<br> │ └── button-with-long-subtitle.png<br> ├── render-karma.conf.js<br> ├── render-runner.js<br> └── renderers<br> ├── helper.js<br> └── visual-diff-test.js
To start, we'll define a Dockerfile for declaring our environment.
https://gist.github.com/griffinmyers/d6d27a22198323d3967f50ddc71b9e4b
This pulls down and installs PhantomJS as well as our other dependencies and copies over our source and testing code. If you're not familiar with any of these commands, their docs are pretty solid.
To build our image from the Dockerfile, we simply run this from our project root:
$ docker build -t visual-diff .
To run the image in a container, we:
$ docker run visual-diff [TEST-CMD]
What do we use for [TEST-CMD] though? Recall, what we want to do here is actually generate our set of result images for each state and then compare each to its corresponding expectation. Let's tackle each step one at a time.
We'll write a config for Karma to orchestrate the rendering of each of our tests.
https://gist.github.com/griffinmyers/d675decacdd301114a969ca02f262537
What we've got here is a Karma Config file that most importantly provides a list of globs to load into the browser (some broken styles to simulate real-world CSS edge-cases, our source code and assets, a test helper, and finally the actual test suite to execute) and a browser launcher to use. We use a custom PhantomJS launcher that defines some special options sent to the PhantomJS process. Critically, we set the size of our viewport on the page when it's created and define a callback function that can be invoked from within our tests. This callback function has access to a PhantomJS Web Page instance, which conveniently defines a #render method we can use for getting the output into an image.
You may notice the onCallback function is arity 1 (has one argument). This is a consequence of the API PhantomJS provides, so we have to shoe-horn everything we need into a single object (including what action we actually want to happen, in case we're using the callback for more than just rendering images). For convenient testing, we add a helper.js file which provides a handy wrapping around this idiosyncrasy:
https://gist.github.com/griffinmyers/56a505fba5dca33feadd16a6f766b0e3
Additionally, we set up some #beforeEach and #afterEach hooks to reliably produce the environment we want for each test run.
We've chosen to export our config as a method so we can plug into Karma's Server API, which gives us control of the execution order of bringing the Karma server up. This is important because it gives us a hook for cleaning the results directory before each test run, so we're sure after a test that it's an accurate “picture” of the test run. As a consequence, we have a file to actually pull in this config and start the server:
https://gist.github.com/griffinmyers/0b98dfef7003b2a7068b9fc3c78b0090
Gnar. Finally, let's write a test!
https://gist.github.com/griffinmyers/c75c1c4b507aa4d273a299ed5322d78b
Yes! We can now render our first test inside of Docker... but speaking of which... if we're running our rendering inside of Docker, how do we get the images out? If you paid attention to the newPage.render invocation, we wrote the images to the /visual-diff folder in the Docker container. Fortunately, Docker provides the concept of a Data volume for just this sort of thing. We can mount a host directory to the container by specifying a mapping in our docker run command with the -v option:
$ docker run -v test/visual-diff:/visual-diff visual-diff node test/visual-diff/render-runner.js
When this exits, we'll see our rendered image at $PWD/test/visual-diff/results/button-with-long-subtitle.png.
“That's pretty neat.”
All we've gotta do now is implement the second bit: comparing our results to expectations.
For this we don't actually need Karma (all our diffing happens outside the browser, in the container itself) and can just invoke Jasmine directly. Here's one way to do that:
https://gist.github.com/griffinmyers/7002f16d308cdb254494c5af18d69dbc
The diff-test.js as referenced could be something like this (it wont change for each new test case you add):
https://gist.github.com/griffinmyers/4f3719aaed297dd4fbb0d97779e6675b
The broad strokes are as we described above: make sure each expectation has a matching result, and for each result ensure it matches its expectation. We can invoke this test with:
$ docker run visual-diff node test/visual-diff/diff-runner.js
Now when we break a test, our process will exit with a non-zero exit code and visually, we get something like this:
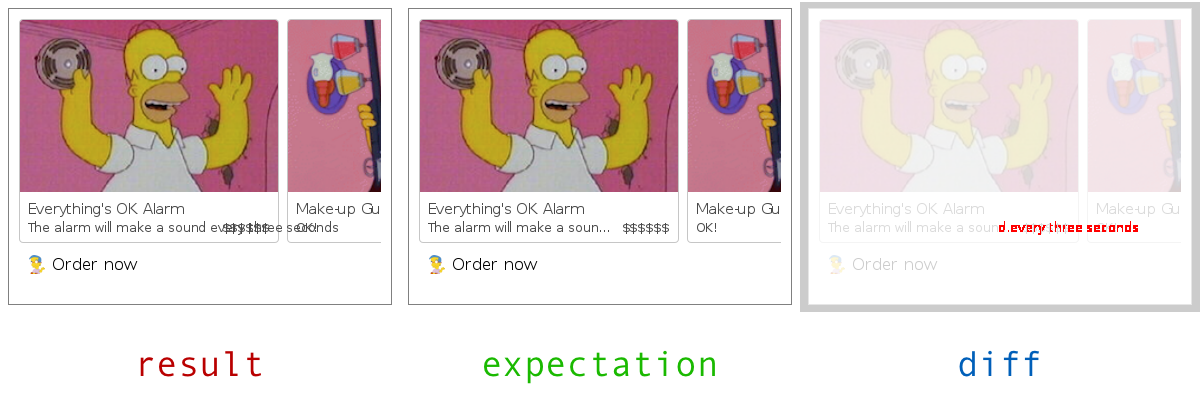
Now all that's left is to spin up as much of these test as we wish and orchestrate the whole process into one command to make it convenient. Writing a Makefile or some npm scripts would be a great way to go about that. You'll be on your way to a big smattering of satisfying green check marks in no time.
Way down here at the lonely bottom, it's clear how much work it is to spin up something like this. There are a lot of dependencies and a lot of joints that could break.
Every testing strategy carries a cost to build and maintain, often on par with the cost to build and maintain the thing you're testing. How do you know if something like visual diff testing is right for you? Coarsely, when the cost of a mistake that visual diff testing would have caught is sufficiently high and sufficiently likely to happen. For instance, we don't see it as a prudent investment for our web dashboard. In our SDK, it bears fruit.
So I hope you're either justified in your decision not to visual diff test your project or excited to try it out. Let us know what you think!

.png)
.png)
